Showing posts with label time. Show all posts

Sunday, April 27, 2014

Elapsed Time Freebies

Hello darlings!  If you read Jamie's last post, you know that we just finished our Time Unit in third grade.  Jamie has some FABULOUS resources so make sure you check out her post!  I just wanted to share with you a few quick ideas to make your time unit more interesting.

Below you will see my Time placemats.  They are simply one clock outline copied onto a large piece of construction paper and then laminated.  These were created by my good friend Kelly when she taught with me over 7 years ago, so yes, they last!   I made you a new one here since I don't have her original.   These mats are awesome because I can quickly move around and see who gets it and who is still confused.    We also used them for "leap frogging" the elapsed time.  Kiddos could draw on the clock itself.  I LOVE the handheld clocks that some companies sell, but I feel that kiddos rely too much on physically moving the hands and when we ask them to do it on paper it doesn't transfer over.  I use the handheld clocks for my struggling kiddos who need that concrete example.  Most of my third graders are cool with the pictorial representation.


These kiddos are working on telling time with the "Time Code"- quarter after, half past, and quarter til.  We divide the clock into fourths and I show them that 1/4 of 60 minutes is 15 minutes.  (60 divided by 4=15)  We talk about how 15 minutes is a quarter of an hour.  I make the distinction that this is NOT like a quarter of a dollar or 25 cents.  That would be 1/4 of 100.  Click here for the Time Code Freebie and Brochure.


After I am confident that my kiddos can tell time, we move onto Elapsed Time (which of course I spelled wrong on the anchor chart...)  We start off with the leap frogs  and then we move onto timelines.  In our Singapore Math Program, kiddos also have to convert minutes to hours.  We do this by subtracting out 60 minutes until we can't subtract it any more.  Of course my advanced kiddos can divide by 60.  

TO apply this to real life, I bring in a bunch of DVD's and set them around the room.  Kiddos then go around and convert the run time into hours and minutes.


A fun review game my students play involves Cell Phones.  Each kiddo gets his/her own cell phone for the day.  They were WAY TOO excited about this, considering it was just paper!  But hey, whatever works!  I have seen those adorable games that involve making wrist watches and then having kiddos walk around and tell the time on each person's wrist.  I took that concept and updated it.  

I don't know about you, but I don't wear a watch.  I always look at my cell phone to tell the time.  Click here to download the FREE game.  


Directions:
Give each student a cell phone and a recording sheet. Students must walk around and exchange cell phones. They record the time on their recording sheet, but they can’t move on until the person who owns the cell phone agrees that the time is correct. 

This game can also be played as SCOOT. Place one phone on each student desk. Students SCOOT from one desk to another, recording the answers on their sheet.


Do you see anything weird about the picture above?  I am glad my kiddos have learned to work cooperatively with everyone.  Go Cards!!!!

I hope this post proves to be useful to you.  We always love to hear about people who use our stuff or got a great idea from a post.  Comments are ALWAYS welcome! It helps us to know we are not just writing a bunch of stuff for nothing.  =)

Blessings!


Friday, April 25, 2014

It's About TIME!

Hey lovely followers and readers! How's it going? Well we made it to Friday! So this has seemed to be a crazy week. I sat at lunch with my wonderful teammates and told them how I felt like this has been the longest week we have had since Spring Break (3 weeks ago), but yet tomorrow is already Friday. I have had a hard time keeping my days straight this week. Maybe this wonderful test prep is getting to me. I wasn't going to post this week with all the craziness, but I think I have found an addiction to it. I would feel like I am letting you wonderful people down, so I just had to. Plus, I am feeling it is about TIME to get back into the swing of blogging weekly, if possible.

Speaking of time (as you can see, I try to use puns as much as possible), we just got done with our time unit and took the common assessment on Wednesday, so I thought I would share some things that I did with my kiddos.

I started out by telling time to the nearest minute, and immediately I found that my kiddos struggled with telling time if the hour hand was really close to the next hour but not quite there (ex: 11:55). They always wanted to say 12:55, since the hour hand was basically on the 12. This became a big frustration for me. Therefore, I had to take several days to review telling time to the nearest minute, and every time we were going to tell time, I would tell my kiddos that I would try to trick them. Also, in addition to telling me the time, I asked them how they got their answer (showing evidence). This really helped with the kiddos who struggled with telling time when the hour hand was so close to that next hour.

Once my kiddos were able to tell time to the exact minute, we moved on to elapse time. Instead of jumping straight into hours and minutes, I started with telling time to the next hour. This really helped them to see how once the big hand got to the 12, it was the next hour. Then I moved into doing elapse time with just hours. Following came elapse time with minutes, and we finished up with hours and minutes.

Since I have 2 math groups, I did this a little differently with my 2 groups. With my lower kiddos, I gave them clocks and put them in a clear zip-lock bag. This way they can write with on them with dry erase markers. I have a system that I model on the Smartboard. I first ask if the minutes have changed. If they have, then we see where the minute started and circle that number on our clocks (ones in our bags) and put an "S" (for start). Then we see what number our clocks ended on. Then we circle that number on our clocks (in the bag) and put an "E" (for end). By making the jumps with our dry-erase markers, we count the jumps by counting by 5's, since we are counting minutes. We record our answer for the minutes. Then, we check our hours and do the same thing. However, instead of circling the start and end numbers, I have them star them. This seems to be a great visual, especially for my lower kiddos. My teammates told me about using a time line to help as well. I didn't do it that way this year, as I am still in the works of learning that way. Just like any other subject, I struggle with teaching something I am not quite comfortable, so I stuck with my usual "comfortable" way. Next year, I plan on sitting down and becoming the student for a bit and learning about the time line, because I feel like it may be easier for my kiddos to understand.

With my higher group, I do things a little differently. I taught them how they can add/subtract time. I showed them how we can set up our math problem and trade. However, instead of trading a 100, we trade 60, since there are 60 minutes within an hour. This was very complex for them to understand at first, but it took no time for them to get it. I also threw in some challenges, as this way doesn't always work. I showed them how if the hour in the start time was bigger than the hour in the end time, you couldn't subtract the time to determine the elapse time. Instead, they had to use the clocks to determine it.

Similar to my 
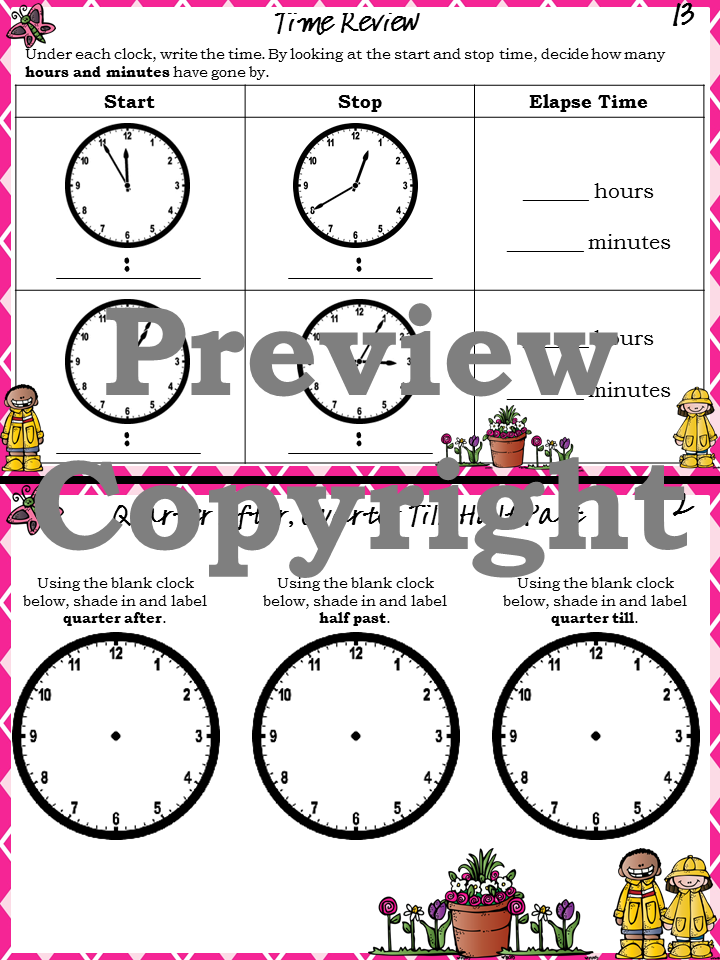
Fraction Frenzy Interactive Book, I created a time booklet to go along with my time unit. It includes telling time to the nearest minute, elapse time (hours only, minutes only, and hours and minutes), telling time using quarter after/quarter till and half past, and comparing events with AM and PM.


In addition to the booklet, I used my games for a review of the concepts as well. This is my "It's Spring Time" game, which involves telling time to the nearest minute.


Because of time, I placed the cards around the room, instead of using it as a game, and had my kiddos complete the recording sheet. Then we reviewed the answers, which the answer key is included. However, I created this game to get the kiddos thinking about time and clocks, not just telling time. One partner picks a card and puts it on his/her forehead without looking at it. Then the other partner reads the clock and then checks their answer. Partner one (one with card on forehead) then starts asking Partner two yes or no questions to try to determine what time the clock says (ex: Is the hour hand on an even number? Is the minute hand past the 6?). They have up to 20 questions they can ask. I plan to use this as a center for a review during MAP Test Prep Friday centers.

Another great game is my Beat the Clock game. This involves elapse time.


Are you interested in these games/booklet? Click on the game/booklet title and it will take you to my TpT store where you can learn more about them. You can download a FREE time game by visiting an old post: Monday Made It & Time Freebie.

Just like any other math concept, I always try to find websites that are useful for my kiddos to play during independent work time. I have created shortcuts for these websites on my student computers on the desktop. I put all my various websites into different folders to help keep them organized. The kiddos love this as they are able to review all of the concepts we have covered so far. Here are a few websites that I have been using with my kiddos:


ABCya-Telling Time-If you need a review of how to create the time. This is a great website to use. The game goes through stages. The first stage is where the kiddos have to create the time to the nearest hour. Then it goes to the nearest 5 min. and so on.


What Time Is It?-This is a great website to use with your kiddos who are still struggling to tell time to the nearest hour and half hour. I used this with my lower kiddos who wanted to switch the hour and minute hands.


Time Games-This is a website that has different links to other time websites, which includes telling time to the nearest minute and elapse time.


KidsNumbers-Time Games-Again, a list of various time games that range from time to the nearest 5 minutes to the nearest minute.


MathNook-Online Time Math Games-This website is awesome as it has free games that line up with the Common Core State Standards.


As always, I appreciate you stopping by! I hope you are able to use some of the resources above! Have a FABULOUS Friday and enjoy your weekend! :)

What do you do to implement time in your classroom? What is your favorite resource that you use? Please leave a comment below, as we LOVE people who give us some new ideas!

 
Don't forget to follow us on BlogLovin'! :)


Monday, April 7, 2014

Monday Made It & Time Freebie

Hello wonderful ladies and gentlemen! Today was opening day with our St. Louis Cardinals (opening day is a big deal in STL if you don't live in the St. Louis area or aren't a Cardinals fan). My hubby and I decided to watch the game at his parent's house. Otherwise, this post would have been published much earlier.
 
So I must admit, I am venturing out of my blogging realm. I was talking to Amy and she had mentioned how link up parties are the best way to get involved with blogs. So I am taking a stab at it and decided I would link up with 4th Grade Frolics for Monday Made It to do something different than just show you what I have been creating for my classroom.
I also have something to admit...I didn't recently do all of this. I apologize that this isn't anything educational. I haven't made anything more recently for my classroom to show off (unless you count all of the resources, centers, games, etc). State testing has taken over my teaching life. However, I have been wanting to blog about this ever since my sister's shower (back in July). What better time than Monday Made It!
 
To start off, I need to tell you that since I grew up on a farm, my mom and I couldn't resist doing a farm theme for the shower. Therefore, I put my computer skills to the test and created banners for the tables (food, cake, gifts, and welcome sign).


I printed off the banners onto white card stock and then cut them into shape. Before online scrapbooks became popular, I loved to scrapbook, so I put my scrapbook tools to good use. When the letters were ready to go, I hot glued them onto binder twine (the string used when baling hay). I didn't cut my twine long enough so it made it a little more difficult to attach to the tables. I had 4 banners that said the following: Welcome to Ashley's Farm, Cake, Drinks, and Gifts.

 
To decorate the tables, I decided to create these centerpieces. My mom cans so I used some old Mason jars and put a wad of binder twine at the bottom of the jar to help keep the sticks in place. Then I tied red Raffia around the mouths of the jars into bows. I took little (skinny) doll rods and cut them into little sections (all different lengths to stagger the height of the animals and barn) I purchased some farm clip art off of Etsy and printed off a big enough size of each animal and barn. I cut each one out and using double sided scrapbooking tape, I taped them onto red circles (that I cut out of red cardstock). I hot glued these onto the doll rods and then tied tan Raffia on the bottom (to give the straw like effect).
 
For the picture frames, I purchased little blocks of wood, little popsicle sticks, and little clothespins. My handyman of a dad cut the blocks of wood into little chunks and put a hole in the middle. I painted them green to so they could act as the grass. Then I painted the popsicle sticks red (farm color) and hot glued them into the holes. At the ends of the sticks, I hot glued a clothespin (open end facing up). Along both sides of the block of wood, I hot glued a farm scene that I created with the same clip art. We put pictures of Ashley (my sister) in the clothespins.
 
To add some spice, I placed strips of burlap (from my parent's farm) on the tables underneath all of the centerpieces. My mom put some of her farm figurines on either side of the frames. She had barns to all different farm animals. I thought these turned out so cute!
 
 
I had a lot of fun creating name tents for all of the food that we had. We tried to keep it all farm themed. Up above you can see that we had little smokies (our name was Piglets).


I also made Miss Piggy. We put fruit salad in a clear, glass bowl. I created ears, a snout, and tail out of pale pink cardstock, along with two black eyes. We had a veggie tray that we named Ashley's Garden, along with deviled eggs (Farm Fresh Eggs) and nachos (Cowgirl Dip). Not pictured was our popcorn bar that we called Chicken Feed.


My sister and I used to make the dirt cups when we were kids for our birthdays and parties at school (back when you could make treats and bring them in). Therefore, my mom and I decided to implement these into the dessert bar (named Farmer's Soil). My sister loves Rice Krispy treats so we made some and named them "Hay Stacks". My creative and talented aunt created the cupcakes and barn out of Carrot Cake. She did an amazing job.


We had a duck pond as well (punch). I couldn't find plain ducks so they were fancier ducks that had hats and sunglasses. They really didn't fit well with our theme. However, you gotta do what you gotta do sometimes.

We put the forks (Pitch Forks), spoons (Shovels), andknives into mason jars as well. We got yellow plates and cute farm themed napkins from the Party Store.

My mom and I had so much planning for this shower. I have such a hard time believing that my niece wasn't even born yet throughout this shower and now she is just over 6 months old. How time flies!!

Just thought I would share a recent picture I took of her last weekend. I never knew I could love a little one so much. Being an aunt is the greatest thing in the world. I love her to pieces and miss her so much when I am not around her. I am one proud aunt!!
 
 
Ok. So for stopping by and reading this post I figured I would share (quickly) a new game I created over the weekend. It's called Tick-Tock Time and focused on telling time to the nearest minute. It's very simple to manage with your kiddos and reviews place value, along with time. (Grab it by clicking on the link above.)


Need some other ideas for implementing some fun games with time!? Check out Major League Math Centers, Beat the Clock, and Spring Time in my TpT store.

Thanks so much for stopping by! Stay tuned for more resources on time, as we just started focusing on it today.

I would love to know how you implement time within your classroom. I am always looking for more ideas from you lovely people! :) Hope the rest of your week goes well!


5-Star Blogger