Monday, August 27, 2012

Library Area

We have been in school for a week and a half and I finally opened my library for the kids to use. I usually open it sooner but I have been busy working on other procedures around the room and the library took a "backseat". I wanted to share with you how I set up my library. First, I have these fabulous shelves that I can open or close. It works great at the end of the year because I don't have to pack up my books and reorganize them at the beginning of the year! Yay!!! 


 I divide my books into categories. The first time I did this it me a long time to figure out how I wanted to separate my books. So, I took inventory of what I had. I started putting books in piles by rhyming books, Authors, loved characters, nonfiction themes, animal friends, bears etc. Then, I typed out the names onto labels and printed them out. I would love to have pictures of the theme but I didn't take the time to do this.

Once I figured out how to label my bins, keeping my library organized was easy. I still keep my seasonal books in a separate bookshelf and I put out those books only during that holiday or season. Keeping kindergarteners accountable for using the library and putting away books in the correct spot was challenging. I have found a strategy that really works for me and saves me time from putting books away. When my students go to the library center, they have to have their "reading stick" to mark the basket they take their book from. They can only take one book out at a time. So, when they finish reading, they find their stick and place the book back in that basket! 
 I have two child sized adirondack chairs that students can use or they can sit on the couch like these two cuties did. Sorry about the weird blurry faces:)

 I like to keep stuffed animals and puppets for my students to "read to"  while in the library center!


One of my favorite books to read at the beginning of the year is Mr. Wiggle's Book. It teaches the kiddos how to take care of their books. After reading the book, I made this Mr. Wiggle chart that I read. In order for my students to be able to go to the library, they have to sign the chart to promise to take care of the books in the library. This poster is in my First Week of School lesson plan on my TPT account. Click the picture to go there:

How do you set up your library? I'd love to hear about other books or strategies that you use to teach your students how to use your classroom library!

-Shelley

Wednesday, August 22, 2012

High Interest Low Readability Help!

Hola mi amigos and amigas!  This is going to be short and sweet!  I need your help.  I teach third grade, so my kiddos should be reading a 28 DRA or Fountas and Pinnell M.  I have a ton of readers on a DRA 10-12 or Fountas and Pinnell G-H.  The problem is they don't want to read "baby books" as they call them and no matter how awesome or cool I make them seem, they don't want to read the books...  Do you know of any high interest low readability books for third graders reading at a first grade level?  I need suggestions!

Also, I have had some questions about my class schedule, so I decided to include it here.  I have also attached my lesson plan page which you can edit to your liking.  In math I do center rotations.  Read my past blog post about that here.


Thanks for your help and advice!


Monday, August 20, 2012

Kindergarten Classroom


I love to see other classrooms to get ideas! I wanted to show you how I set up my classroom this year! I'm super excited because this is a brand spankin' new room! Woo hoo! I had to dust everything off from the dry wall dust. Yes, I did say dry wall! We can staple or tack our poster up:) No hot glue gun burns for me this year! I begin the year by putting all of my shelves out but I don't fill them up yet! I have found that when I do, parents(during meet the teacher day) will allow their child to come into my room and start taking things out to play with! I put a stop to this by not filling all of my shelves. 

The shelves that I do fill, I wrap in butcher paper and stick this "No Peeking" sign on. Click on the picture below to download a copy of the sign!


Everyday at the end of the morning announcements, we say our rules: Green Tree Gators are safe, respectful, and responsible learners. I use the same classroom rules. SSSSHHHHHH...... don't tell my students! They think they make up the rules! We "make up" our rules by listing everything we want in our classroom. Then, I highlight all the things that are respectful in one color, responsible in another color, and safe in yet another color! We talk about how all the things we talked about go along with our  "Gator" rules. I like to put the rule making onto my students so they can take ownership! We haven't gotten to our rules yet! I talk about expectations as I'm going through procedures but I haven't really dove into teaching our rules. When I do, I post them on the board. Also, I'm going to take pictures of my students doing safe, respectful and responsible things around the room and will post them throughout the year! At the end of each day, my students get a stamp on their hand if they have made smart choices. If not, then they don't get a stamp and they get a note that says: I did not get a stamp today because I chose to: ________________________ I will make better choices tomorrow. Click on the picture below to download a copy!


 I love, love, love my IMAGINE poster! I do a hopes and dreams writing at the beginning of the year and hang it up all year. At the end of the year it goes in their kindergarten portfolio. I also reference it throughout the year. I can say to a student, "Remember at the beginning of the year when you wrote that you hoped to be able to write by the end of kindergarten? Now you can!" Then, we can celebrate our successes as a class! This is one writing activity that I have in the First Week of School lessons plan on TPT. Click here to check it out!


My calendar: It's not anything special but I do like to have math concepts up that we are discussing for quick reference. I do the rest of my calendar on the smart board!


I really like my birthday graph! It makes it easy to see who has a birthday for the month we are in. Also, I just spelled birthdays with a fun font and printed each letter out on different colored construction paper. Then, I cut it out using craft scissors. I stapled(or you can hot glue) it to the wall only stapling the two opposite corners so it makes a 3D affect:) I also do this with my welcome sign outside of my door.


This is my brag board! I also use it when I need papers to dry from using paint or glue! It is quick and easy to hang up. I used to hang clips from the ceiling but I'm trying this instead! How do you display your student's work?


This is my reading area. It is closed for the moment but I will be teaching about how to care for books tomorrow. So, then I will open up the fun! I have my books arranged in baskets with titles. When my students find a book, they put a clip(clothes pin) on the basket so they know where to put it back. Do you see my Chicka Chicka Boom Boom tree? That's one of my favorite things!!!
This is my second teaching area. My other teaching area is in the front of the room where the smart board is located. I'm excited for two meeting spots. This way my students won't get bored sitting in the same spot! Plus, I love sitting down for a moment on the couch! 


My sink and cabinets!!! LOVE!!!!!!!!


The top cubbies are used for students' towels. We do read, write and rest time. Students have a choice of these three things. The bottom cubbies are for students' supplies.

 This is "THE HAND"! It reminds us of what to do when we come to a word we don't know. Obviously, we are not ready for this but I put it out anyway!

Thanks for checking out my pictures! I would love to hear how you set up your room! Do you have suggestions or tips for how you do things in your classroom? Please share!

-Shelley


Thursday, August 9, 2012

Classroom Setup with Lots of Freebies!


Just linked up! 


Sorry it has taken me forever to get back on here.  I've been busy setting up my classroom and getting ready for the new school year.  My class list is very strange this year... I have two Mollies, two Kamerons, two Kelli's, two Jennas, and two Tylers.  In all my years of teaching, I have never had this many doubles!  This year is going to be interesting. =)

So.. on to the good stuff.  Here is a before of my room looking toward the door. Look at all the junk in the corner! =)


Here is the before shot looking while I was standing at the door.  So  yucky and bare!


"In every job that must be done, there is an element of fun.  You find the fun and SNAP, the job's a game!" I took Mary Poppin's advice.  I snapped and voila!  Here is the after pic. (Notice how it is dark outside?)

As you walk in the room, I have a weird wall indenture thing, so I decided to put a little work area here.  The bulletin board is where I will be putting my Rockstar of the Week.  I got the Rockstar sign at Target. The chairs are from Lowes and were on sale for $7!  The lamp is from home.  To the right, is where I will put the kids names for the helpers.  I only have one boy helper and one girl helper each day.  It is much easier for me and the kiddos instead of assigning 500 jobs to different kids. =)

Here is my Word Wall that I printed a long time ago from Teaching In Flip Flops.  The pink table will be for Science materials and activities.

Here is a view of the math section of my room.  I made labels on the computer that I bought from Walmart-Avery 2817.  Here I store clocks, Singapore Math discs, dice, counters, playing cards, rulers, and other math manipulatives.  The little BB is my Math rotation sign. Scroll down for a close up pic.  The bench was made by my grandpa when I was a kid.

I teach math in differentiated groups.  North is my low group so they meet with me for their lesson first.  West is the Highest group so they do their assignment first and meet with me last.  My rotations last for 15 minutes each.
Teacher: my direct instruction lesson tailored to this group
Desk: The assignment for the group
Game: In each group, kids are assigned partners and they play a game based on the day's skill
Fast Facts:  I have 3 computers in my room, so kiddos log onto xtramath.org and complete their fact lesson for the day. (I have an entire blog post about xtramath).  The kids who are waiting to use the computer (the other partner) use flashcards to practice.  Then the kiddos switch.  Click on the pic to download the free BB.  Sorry, I cannot send you an editable version due to graphics' copyright.


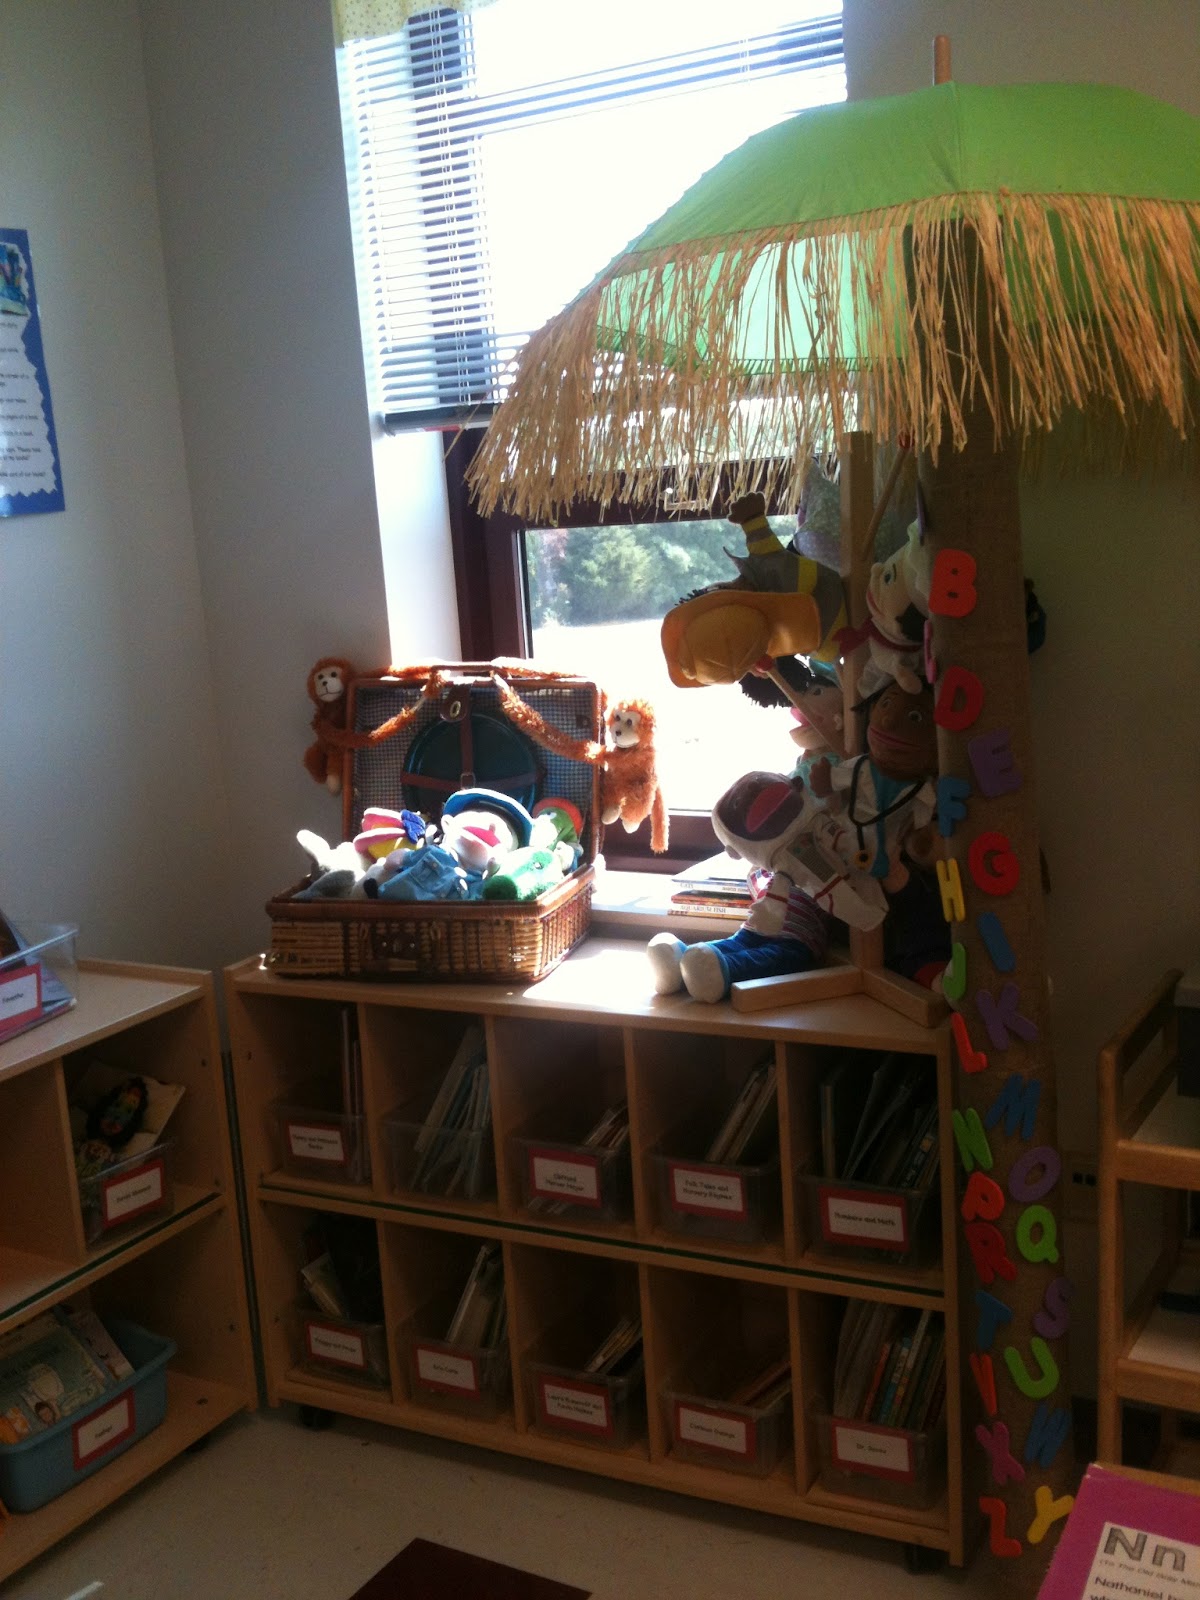
Hello Mr. Tiger!  Notice he is guarding our Book Bins.  These are where kiddos store their books and Reading Journals for Reading Workshop.  I bought the bins 3 years ago at Target. (so they have lasted)  They are ice cube trays.  I use name tags to write the kiddos number on it so I don't have to change the labels each year.  I'm lazy. =)

 To the right are our Science Tubs from the district.

This is my small group area.  I use a picnic table, because I like it, and because kids don't have to scoot up a chair.  The BB has a birthday section and the blank section will be used for hanging anchor charts for reading.

Here is the front of the room with my smartboard.  I have no idea how I ever taught without it! The letters are the peel and stick from Carson Delosa (I think).  I have zebra print banners that I got from the Target party section under that.  On the bottom right, you can see our flipchart.  The right purple BB will be used for focus lesson anchor charts.  My easel is right next to it.  This carpet is where I do whole group lessons.


Here is a better view of my focus lesson area.  Behind, you can see my computer area.  I got the hangy ball things from...you guessed it...Tarjay! (Target)

Here is a close up to the other BB.  The green pocket chart will be used for book recommendations and the Bravo Board will be used by the kids to put up compliments for each other.  The basket is where we will store our nurse's stuff like passes and band aides.


This is our writing and supply area.  I have extra crayons, scissors, stick notes, and glue over here.  The lamp was on sale at Gordmans.  The tray to the right is the work turn in tray.  The basket on top is where we store our high frequency words notebooks for spelling tests. (I have an entire blogpost about this).  Behind all this loveliness is my desk area...

Here is my library section.  I label bins by genre.  I think I printed them off from Teaching in Flip Flops many moons ago.  The BB will be used for vocabulary words.


More books and a side view of my messy desk.


 Here are our mailboxes that have lasted me nine years!  Got those babies at walmart I believe.  The little posters are our class schedule and our study hall schedule. The Treasure Box is from my grandpa, so it is probably a geniuine super old Pirate chest.  JK

I forgot to take a pic of my door, but I have a Where Are We Sign on it.  I use a giant paper clip to show where we are. Click the pic to download it for free.  Sorry I can't make it editable.

I hope this is helpful darlings!  Have fun setting up your classrooms!

5-Star Blogger